11/19/16

Please Disturb

If you value your sleep you probably configured your iPhone to use the "Do Not Disturb" function. iOS allows you to silence all calls, texts and alerts for a specific time period. But what if you want to allow calls or texts through even if "Do Not Disturb" set up and active?


Recently, my pregnant daughter asked my wife to help her during birth. Kind of an assistant doula if you will. Since most births occur during the wee hours of the morning my wife needed to set up her phone to allow calls and texts to come through even when "Do Not Disturb" was set.

Before iOS 10 the only way to allow users to call you was to open "Settings", navigate to "Do Not Disturb" and select "Allow Calls From"


BUT...you could only allow calls from all the people in your favorites or a select a specific group you wanted to grant access. If you only wanted one person to have access you would need to set up a brand new group and add that one person. Starting with iOS 10 you can now grant access to a single person inside your contacts application.

Open "Contacts" and select the person you want to grant access and Edit the contact. Now you just need to select "Ringtone"  and make sure the "Emergency Bypass" is selected. If you want to allow Texts through as well just edit the "Text Tone" the same way and enable the same "Emergency Bypass" switch.


That's it! Now even if it's the middle of the night that persons calls and texts will make it through and you won't miss the birthday party!


10/3/16

MacOS Sierra - Gatekeeper Security & Downloaded Apps

MacOS Sierra has been out for a while and most of you have probably downloaded and installed it. One of the focus areas of Sierra is security. Apple has plugged some security holes and added new features to protect the user from security threats as well as self inflicted damage. 

In the past Mac users touted the innate security of the UNIX undermining of MacOS vs. the sieve that was Windows. Five or ten years ago that was true. Not so today. Today the Mac is targeted just as much as Windows but thanks to the UNIX base of MacOS it is still harder to crack, but not impossible. Especially if the user is the one installing the Malware. 

Every time you download and run an application you are trusting that the creator of that app doesn't have any ill intent. Most of the time you are right and everything is OK. But recently there have been some applications that have been loaded with software that isn't so friendly. To prevent that, Sierra has a built in Gatekeeper that prevents the user from running unsigned applications. That's a good thing but it can sometimes be a pain. If you have ever downloaded an update or application from the Internet and were unable to open it then this tip is for you.


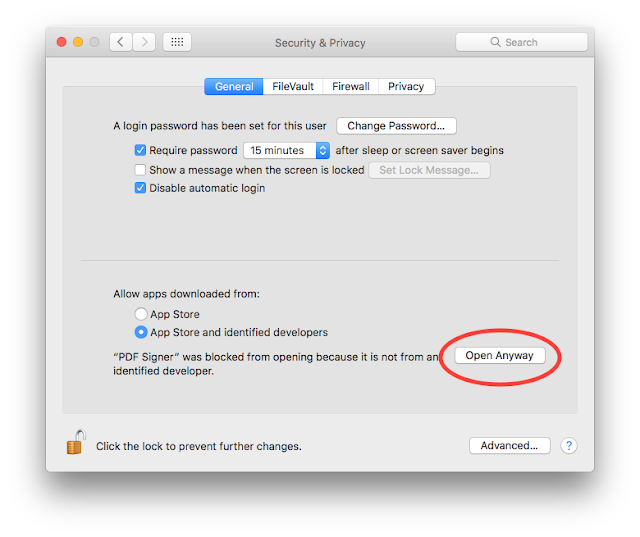
The first thing to know is that you can still open any app you want with a minimum of hassle. After you try to open an app and it fails, go to the System Preferences and open the "Security" Tab. It should show the last application you tried to open and a button saying "Open Anyway" Just click that and try again. 


If you want to have the ability to bypass this step and open any application, regardless of where it came from then you need to use the terminal to disable the Gatekeeper default settings. 

If it is open close System Preferences and open the Terminal application (usually located in the Utilities folder). Type the following command: "sudo spctl --master-disable" without the quotes. 

After you hit return you will be asked to enter your password. Once you do that reopen System Preferences and you should see the a third pick under the security tab allowing you to open downloaded apps from anywhere. 

Just remember that just like Uncle Ben said "With great power comes great responsibility"  Know where you are getting your applications and make sure that you don't inadvertently give some Phishing scam access to your computer. 

If you want to go back to default setting you can open the terminal again and just type "sudo spctl --master-enable"

I hope this tip is helpful but remember to keep safe out there. 

5/13/16

Amazon Prime Video & Safari: Let's Call a Truce

I must admit that it was a sad day when the local Blockbuster Video closed. But only for a day. I quickly got over it when we signed up for Netflix. Once we started to stream our movies and TV shows we never looked back. 

Today it seems like every home has at least 2 or 3 video streaming services. My family and I use an Apple TV and routinely stream our own recorded TV Shows, a few Apple provided TV shows and movies as well as Netflix shows. What we don't use is Amazon Prime Streaming. We are a Prime member and have had the service since it started, we just never use it. 

One of the main reasons Amazon isn't part of our streaming selections is because they don't offer an Apple TVOS app. The other reason is that I could never get it to work on Safari. As of today Amazon still doesn't offer and TVOS app but I finally figured out how to get it to work on Safari.


Amazon Prime streaming video service comes free with their $99 Prime membership.  To play Prime video there is a minimum set of requirements that you can read about here. The key is that Amazon wants you to use HTML5 and Safari isn't listed as one of the Browsers that Amazon supports HTML5.

I'm not a huge fan of Plug-ins but Amazon Prime Video also supports Microsoft Silverlight Plug-In.  Since Microsoft Silverlight supports the Mac I installed Silverlight and tried again. Of course it failed. After 3 or 4 more attempts I gave up. That was over a year ago. It was only recently that I decided I would give it another try. Low and behold it now works!

In order to use Safari to play back Amazon videos the first thing you need to do is download and install the latest copy of Silverlight.


Once Silverlight is installed Open up Safari and navigate to the Amazon Prime website then open Safari Preferences.


Once the Preferences window is displayed open the Security tab and make sure "internet plug-ins:" is checked then click the "Plug-in Settings" Button.


Make sure that "Silverlight" has a check in it's check-box and that the Amazon entry shows "Allow" is from the pull down menu.  


Click "Done" at the bottom of the window and everything should be fine. On one of my Macs I had to restart Safari to get streaming to work so if things don't work give that a try.

Now you can binge watch till your hearts content! Oh, BTW Amazon, can you please get to work and please provide an AppleTV app? Maybe your viewership would increase.


1/4/16

Power User Tips & Shortcuts

Even though I have a blog I don't really consider myself a power user. There are some people out there who can do amazing things from the keyboard and seemingly never touch their mouse. There are others who seem to never touch their keyboard but trigger shortcuts and autofill using nothing but mouse clicks with minimal keyboard input. Using, or not using, a keyboard doesn't make you a power user but it does show how much time you spend streamlining your workflow.

To me, being a power user is understanding your own workflow and developing a strategy to smooth it out and speed it up.  No radioactive spider bites, lightning bolts to your chemistry set or urge to avenge your dead parents required. 


So here's a few of my favorite tips that will help you on your way to becoming a power user. Or at least speed things up in your everyday Mac-Life.


Copy path to a file


Do you use the UNIX command line or sometimes just need to include the full path in an email to someone? If so then this tip can come in handy. Rather than type it out you can copy the full path using the finder. Just open a Finder window use a "Right-Click" and hold down the "Option Key". The following drop down menu will show up. 


Just select the "Copy 'filename' as Pathname" and paste it.


Multiple Tabs in Finder Windows

This next one surprised me. I'm not sure when Apple added this in (I think it was Mavericks but I'm not sure) but the finder now supports multiple tabs just like Safari. 

Open a Finder window the hit the familiar "Command+T" key command that every modern browser uses and you will have a second tab in the same window. 


This can really clean up your desktop and make your screen feel a lot larger. You can even drag a file from one tab to the next to copy or move files. 


System Prefs - Extensions

This next item is a great add-on that came with OS X Yosemite. Basically Extensions allow Apple and third party software companies to add functionality to the Finder and specific applications.

Open up System preferences and select "Extensions"


The left hand column is a listing of the available extension categories; 

AllSee all extensions you installed on your Mac. These are extensions created by third-party developers. If the extension is a content extension that enables extra functionality in apps, you see an Actions checkbox below the extension. If it’s a Finder extension, you see a Finder checkbox. Select the checkbox to enable the extension.


ActionsSee all content extensions installed on your Mac. Select a content extension to make it available in apps. For example, if Markup is selected, you can draw on pictures and sign documents in Mail, TextEdit, and other apps.


FinderSee all Finder extensions installed on your Mac. Select a Finder extension to make it available in the Finder. 

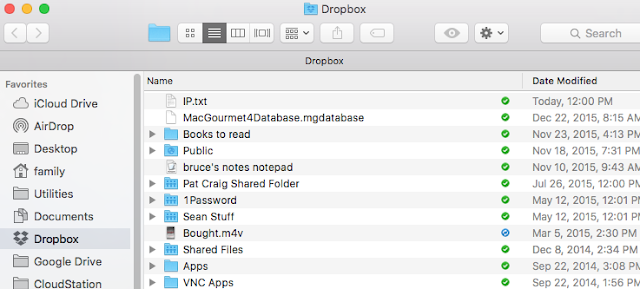
To put it in simple terms, Finder extensions add finder functionality for the listed application. In the case of Dropbox it visually shows the upload status with a green check or blue uploading icon.


Other applications behave in a similar fashion showing status or giving you options. Bitcasa's extension allows you to share files with a right click


Photos -  With OS X 10.11 El Capitan, Photos now lets you apply third-party image editing extensions within the application. If your third party application supports it you can enable access to that application within Apple Photos by selecting it.
Here's a view of Apple Photos showing the add-on extensions when you use edit.


Share  -  Select the items that you want in the Share Menu, and in the Social Widget in the Today View in the notification center.
  • The Share menu is available in several apps, including Safari, Contacts, and the Finder. If an item is selected, but you don’t see it in an app’s Share menu, then you can’t use that item to share in that particular app. 
  • Only items that allow posting or messaging can appear in the Social widget.


Extensions are a great add-on to OS X and remind me of the old OS7, 8 & 9 days of system extensions. It's a great way to add functionality to your Mac, improve your workflow and add to your growing Power User skills.